
Q1.A company’s marketing department captures leads by using form submissions in Dynamics 365 Customer Insights – Journeys (formerly Dynamics 365 Marketing).
Marketing nurtures the captured leads and then hands them off to the sales department.
Approved leads are processed by sales representatives in Dynamics 365 Sales.
A lead is considered “stale” if it is still not sales-ready after six months.
You must create a bulk delete job that deletes stale leads only for leads that have a Parent Contact set.
You have started building the query from a saved view, but you must complete the conditions.
Select the appropriate operator or value to set for each search condition.
Show answer
In this question, you delete only leads that are more than six months old and not sales-ready, and only those that have a parent contact.
Because the time condition is already satisfied by the saved view, as additional conditions you limit the lead source type to a value that Equals Marketing.
Next, you set Sales ready to Equals No to extract the leads that are not yet sales-ready.
Finally, to delete only leads that have a parent contact set, you specify Contains data for Parent Contact.
This meets the requirement while preventing the deletion of leads that should be kept.
Delete large volumes of specific targeted data with bulk delete
Q2.In Dynamics 365 Customer Insights – Data, you use Microsoft Dataverse as one of the data sources to ingest.
During the unification process, you must identify the primary key.
Which data types can be used as a primary key attribute?
Select three.
Each correct answer presents a complete solution.
Show answer
In the unification process of Customer Insights – Data, the primary key must be able to uniquely identify each record.
Therefore, data types that make it easy to ensure uniqueness are required.
Whole Number can assign unique values such as sequential numbers, and String can be used as a unique text value such as an email address or ID.
GUID is designed as a globally unique identifier and is ideal for a primary key.
By contrast, Boolean has only true/false values and cannot ensure uniqueness, and Integer is not treated as a standard Dataverse primary key type.
A primary key must always be unique for every record.
A GUID or a unique string is the most suitable choice as a non-duplicating identifier.
Data unification overview
Q3.You must configure a security role to grant read-only access to Sales Opportunities.
Which procedure should you follow?
Show answer
This question asks where you manage access to Sales Opportunities.
Security roles are the permission management feature of Dataverse, and in the traditional Dynamics 365 UI you created them by going to Settings, then Security, then Security Roles.
Therefore, among the options, A is correct.
In the current, latest UI, the mainstream approach is to open the environment in the Power Platform admin center and manage security roles from Users + permissions.
The key to the decision is that the object of permission management is the security role.
You do not create roles from Marketing or Reports, so B and D are incorrect.
Create or edit a security role to manage access
Q4.A sales manager’s assistant asks you a question about how delegation behaves in Dynamics 365 App for Outlook.
They want to know how each column (field) is set when an email is tracked.
In particular, you must explain who becomes the owner of an email tracked from a delegated mailbox.
How should you explain it?
Show answer
When you track an email from a delegated mailbox in Dynamics 365 App for Outlook, the owner of that email is set to the mailbox owner, not to the delegate user who actually performed the action.
This is because, due to the server-side synchronization mechanism, the owner of the record is determined per mailbox.
Therefore, regardless of who tracked it, it is always associated with the owner of the primary mailbox.
It is important that the mailbox owner, not the delegate user, becomes the record owner.
In server-side synchronization, the owner of the email is determined per mailbox.
About server-side synchronization
Q5.You have enabled Dynamics 365 App for Outlook for the sales team.
Because users are unhappy about the effort of manually tracking emails, you are considering introducing folder-level tracking.
To allow users to configure the rules themselves, you must enable folder-level tracking in the environment.
Which three actions must you perform in order before saving the changes?
Arrange the three appropriate actions in the correct order.
Drag (or tap) the required number of items from the “Options” on the left to the “Answer area” on the right. You can drag within the answer area to reorder items.
- Select a server profile
- Select Email tracking settings
- Access the environment settings in the Power Platform admin center
- Disable the use of tracking tokens
- Turn on tracking
- Enable folder-level tracking from Exchange folders
- Drag here
Show answer
Folder-level tracking must be enabled as an environment-level setting.
Therefore, you first access the settings of the target environment in the Power Platform admin center.
Next, you go to Email tracking settings and configure the relevant feature.
Finally, by enabling folder-level tracking that uses Exchange folders, users can use automatic tracking on a per-folder basis.
Folder-level tracking must be enabled in the environment (organization) settings.
The core is enabling Exchange folder integration within the Email tracking settings.
Manage email tracking settings
Q6.An amount is registered in multiple currencies on a single Opportunity.
You update the exchange rates manually once a month.
You must ensure that the currency values are reflected correctly in reports.
When is a new exchange rate applied to opportunity records?
Show answer
In Dynamics 365 (Dataverse), a change to the exchange rate is not immediately reflected in all records; it is reflected when rollup fields are recalculated.
Aggregate values related to currency are recalculated periodically by system jobs, and the latest exchange rate is applied at that timing.
Therefore, the point at which the calculation job of the table that has the relevant rollup fields (msdyn_projectteam in this question) runs is the timing of application.
A change to the exchange rate is not applied immediately, but when rollups are calculated.
Currency-related values are updated by system jobs (rollup field calculation).
Define rollup columns that aggregate values
Q7.Note: This question is part of a series of questions that present the same scenario.
Each question in the series contains a unique solution that might meet the stated goal.
Some question sets might have more than one correct solution, while others might not have a correct solution.
After you answer a question in this section, you will not be able to return to it.
Your organization recently deployed Dynamics 365 Sales to the sales team.
An initial assessment revealed that usage is limited because many sales users prefer to work in Microsoft Outlook.
You therefore decide to enable Dynamics 365 App for Outlook.
To do this you must perform several actions, and each action is part of the solution but does not, on its own, fully solve the problem.
Action: Assign the Salesperson security role to the users on the sales team.
Does this meet the goal?
Show answer
Assigning the Salesperson security role is important in that it gives users the necessary data access rights, but it does not satisfy the requirements to make Dynamics 365 App for Outlook available.
Using the Outlook app requires configuring server-side synchronization, approving mailboxes, and setting up email processing.
Therefore, simply assigning a security role does not enable the Outlook integration or the email tracking feature.
Using App for Outlook requires server-side synchronization and mailbox configuration.
Assigning a security role alone does not enable email integration.
Deploy and install Dynamics 365 App for Outlook
Q8.A bakery uses Dynamics 365 Sales.
All of the bread sold at this bakery is set to the same price.
Special bread flavors are developed regularly.
You must add the new flavors to the product catalog.
What should you do for each scenario?
Select the appropriate option.
Show answer
This question is about understanding variation management in the Dynamics 365 Sales product catalog.
When only the flavor differs while the price is the same, it is appropriate to manage them as a product property rather than increasing the number of individual products.
This lets a single product carry an attribute called flavor.
For an existing opportunity, there is no need to delete and re-add the product; you can handle it simply by selecting the new flavor as a value of the product property.
Attribute differences such as flavor are best managed as a product property.
The key point is that on an opportunity you do not recreate the product but handle it by changing the property value.
Use properties to describe a product (Sales Hub)
Q9.Suspicious field changes have been observed on certain records in the organization.
You want to determine the cause.
You must audit user access and updates for several custom tables.
Select the two checkboxes that must be enabled as prerequisites.
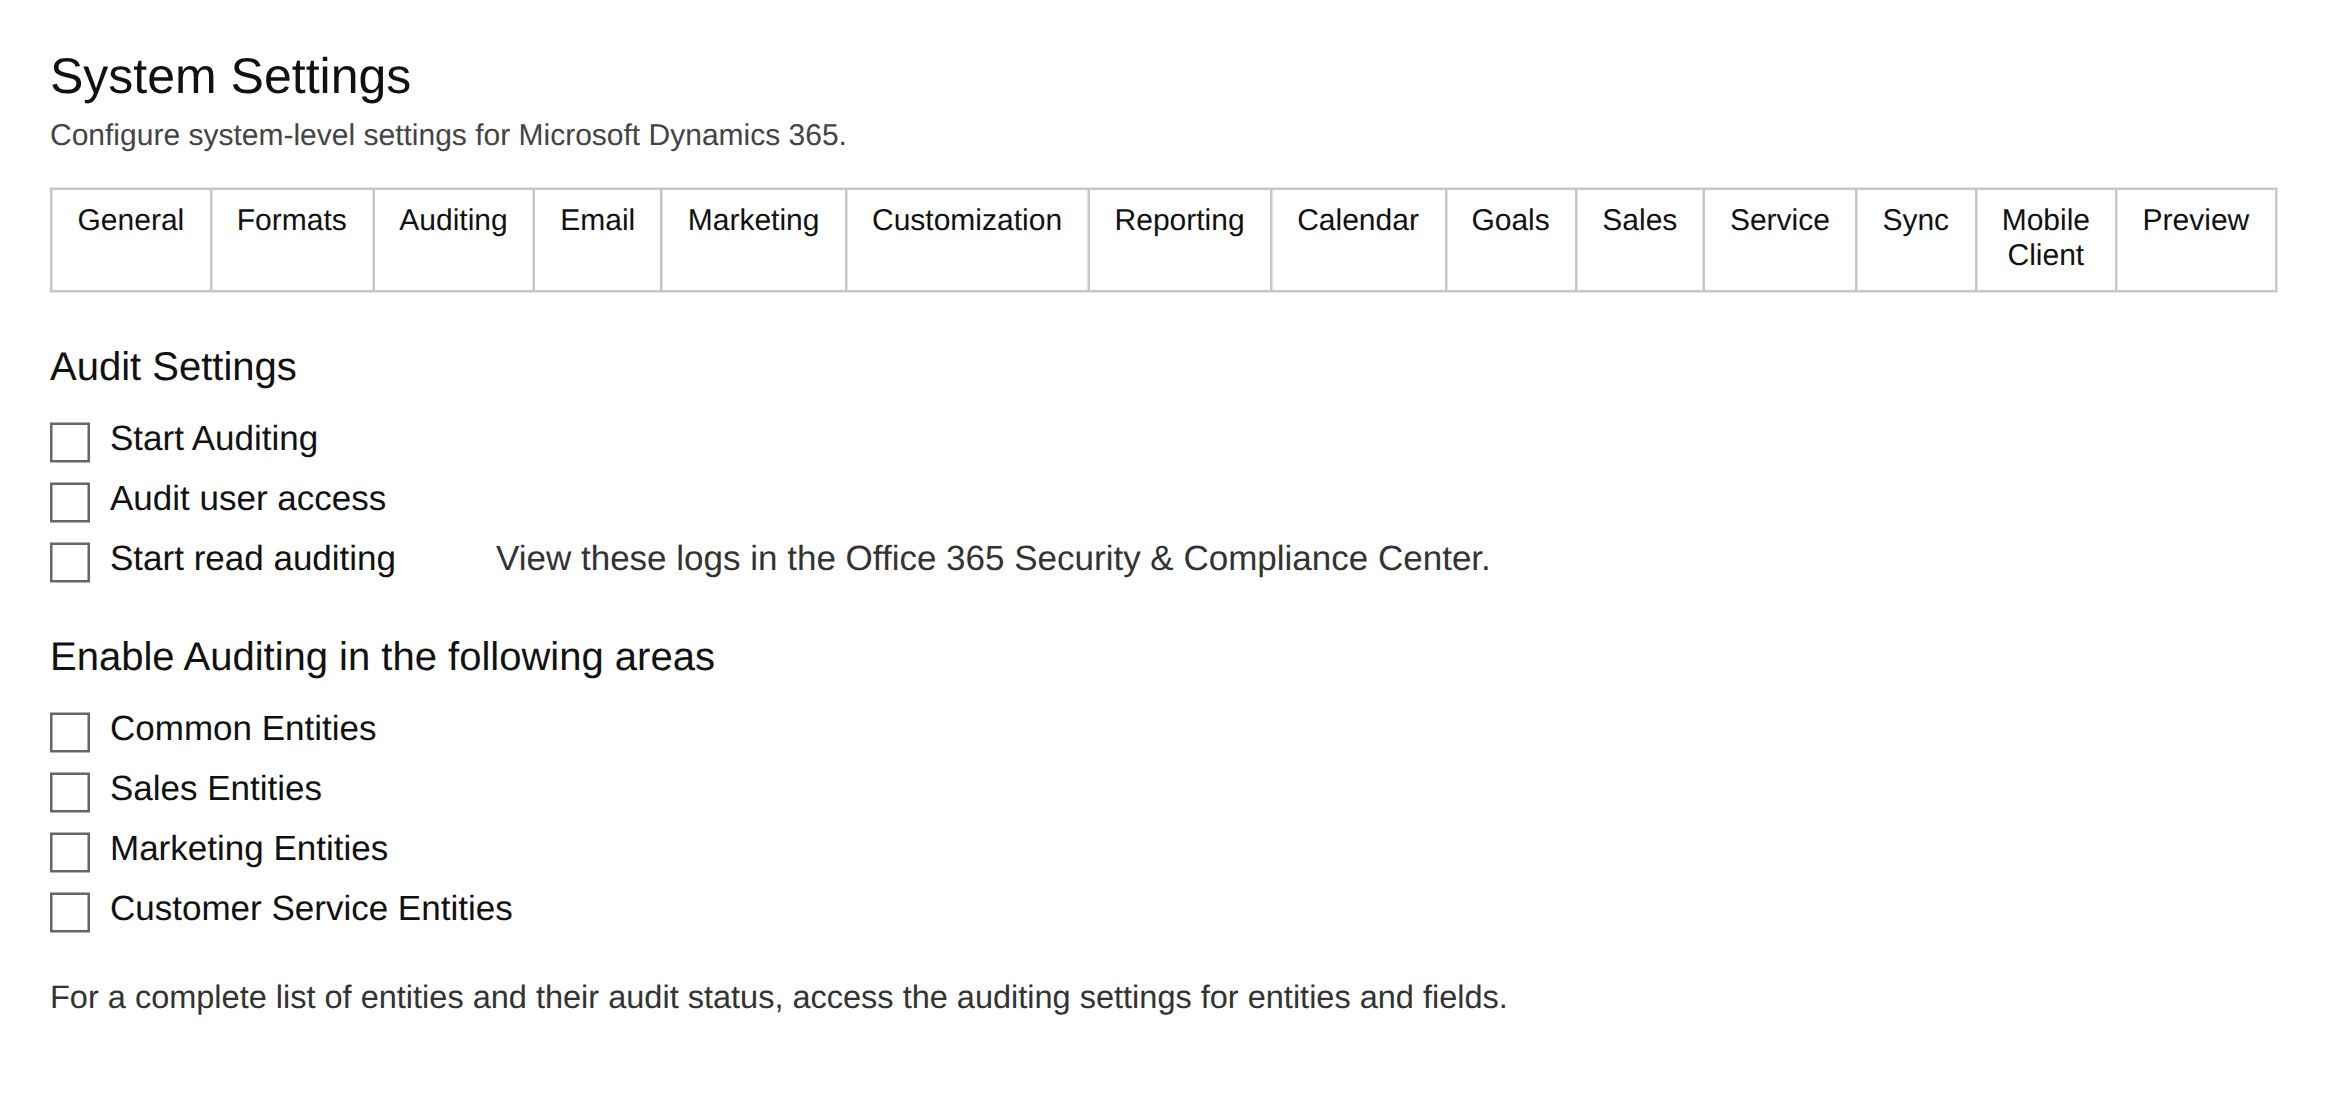
Show answer
To use the audit feature in Dataverse, you must first enable auditing for the entire system.
Therefore, “Start Auditing” is an essential prerequisite.
If this is disabled, no logs are recorded even if you configure auditing per table or field.
In addition, to track user access and operation history, you must enable “Audit user access”.
Auditing does not work unless it is first enabled at the organization level.
Tracking user operations requires enabling “Audit user access”.
Manage Dataverse auditing
Q10.The sales team wants to display a timeline of related activities and notes on a customized Dynamics 365 Sales form.
You must add a timeline control to that form.
Which five actions must you perform in order?
Arrange the five appropriate actions in the correct order.
Drag (or tap) the required number of items from the “Options” on the left to the “Answer area” on the right. You can drag within the answer area to reorder items.
- Add all the tables you want to show on the timeline.
- Select the table in the solution you want to edit.
- Save.
- Open the form from the table you want to add the control to.
- Configure the control.
- Select the area where you want to add the component.
- Select Timeline from the component list and add it to the target section.
- Save and publish.
- Drag here
Show answer
To display a timeline in Dynamics 365, you must add a timeline control through form customization.
First, you access the target table from the solution, then open and edit the relevant form.
After that, you select Timeline from the component list, add it to the target section, and configure the control.
Finally, by saving and publishing, the change is reflected to users.
The timeline must be added as a control on the form.
After adding it, you must not only save but also “publish” for it to be reflected to users.
Set up the timeline control